LogoLogo
Cocktail Cloud
  • What is Cocktail Cloud?
  • Apply for Service
    • Using Cocktail Cloud
  • overview
    • Kubernetes and Cocktail Cloud
    • Understanding Concepts
      • Platform
      • Workspace
      • Cluster
      • Service Map
      • Image Build
      • Security
      • Monitoring
      • Catalog
  • Getting Started
    • Cluster Creation
      • AWS (EKS)
      • NCP (NKS)
      • Azure (AKS)
      • GCP (GKE)
      • ETC (Datacenter)
    • Cluster Registration
      • AWS (EKS)
      • NCP (NKS)
      • Azure (AKS)
      • GCP (GKE)
      • ETC (Datacenter)
    • Managing Cloud Provider
      • AWS
    • Creating a User
    • Create Service Map
    • Create Registry
      • Create Registry
      • External Registry Registration
        • Setting Up AWS ECR
        • Setting Up Azure ACR
        • Setting Up Docker Hub
        • Setting Up Docker Registry
        • Setting Up Google GCR
        • Setting Up Harbor
        • Setting Up Naver
        • Setting Up Quay
    • Create a Workspace
  • Cluster Backup and Restore
    • Cocktail Backup and Restore
    • Backup/Restore Preparations
      • AWS S3 Configuration
      • Azure Blob Storage Configuration
      • Google Cloud Storage Configuration
      • MinIO Configuration
    • Create storages
    • Backups
    • Restoration
    • Backup/Restore Overview
  • Log Service
    • Cocktail Log Service
    • Installation
      • Install Log Service
      • Registration Log Service
      • Install Log Agent
      • Install Log Operator
    • Setting
      • Change Opensearch Admin password
    • Application Logs
      • Application Management
      • Application logging
        • Automatic instrumentation of container logs
          • Java
          • Python
        • Manual measurement of file logs(SDK)
          • Java
          • Python
        • Manual measurement of file logs (Sidecar)
          • Fluent-bit
    • Container Logs
    • Cluster Audit Logs
    • Troubleshooting
  • CI/CD
    • Creating a Build Server
    • Build Image
    • Setting up a Pipeline
  • application
    • Catalog
    • Application Deployment
    • Configuration Information Creation
    • Volume Requests
    • Service Exposure
    • Ingress
    • Service Mesh Configuration
  • Platform Management
    • Multicluster Configuration
    • Cluster Management
    • Workspace Management
    • Security
    • Integrated Monitoring
  • API Management
    • API Token Issuance
    • API Issuance History
    • API Execution Logs
  • Certificate Management
    • Issuer Management
    • Private Certificate
    • Public Certificate
  • Deepening operations
    • Maintaining Login Session in Case of Inability with Ingress Configuration
    • Add Ingress Proxy Configuration
    • Accessing Harbor from a Server Other Than the Registry VM
    • Configuring Harbor with a Public SSL Certificate
Powered by GitBook

â“’2023. Acornsoft Corp. All rights reserved.

On this page
  • 1. Workload Group Creation
  • 2. Workload Creation
  • 2.1 Enter Basic Workload Information
  • 2.1.1 Register Image Pull Secret with Workload
  • 2.2 Enter Container Information
  • 2.3 Enter Init Container Information
  • 2.4 Enter Deployment, Autoscaling, and Update Policies
  • 3. Modify Workload
  • 3.1 Detailed Inquiry of Workload Settings
  • 3.2 Change Workload Settings (in the case of modifying the container image)
  • 3.3 Check the Application of the Modified Settings
  • 4. Stop/Restart/Delete Workload
  • 4.1 Stop/Restart Workload
  • 4.2 Delete Workload
  • 5. Workload Group Management
  • 5.1 Change Workload Group Display
  • 5.2 Delete Workload Group

Was this helpful?

Export as PDF
  1. application

Application Deployment

PreviousCatalogNextConfiguration Information Creation

Last updated 10 months ago

Was this helpful?

Before creating a new workload, you need to create and register imagePullSecrets. Please refer to

1. Workload Group Creation

Create a workload group on the Workload tab of the Service Map.

1) Click on [Application] - [Service Map] tab, select the service map where you want to create the workload, and navigate to the Workload.

2) Click the expand menu (three dots) next to the workload group name.

3) Choose the desired direction for adding a group from the additional items (e.g., Add Group to the Right).

4) A text input form for the name of the workload group will appear. Enter the name of the workload group and press Enter.

  • The workload group name is a mandatory field.

5) Confirm that the workload group has been added.

2. Workload Creation

Create workloads such as Deployment, Stateful Set, Daemon Set, Job, Cron Job, etc. Although the types of workloads may differ, the process of entering container information is fundamentally the same.

1) Click on [Application] - [Service Map] tab, select the service map where you want to create the workload, go to Workloads, and click the "+ Create" button.

2) Choose the type of workload you want to create.

2.1 Enter Basic Workload Information

1) Enter basic information for the workload (type, name, group, description, labels, annotations), deployment and management policies (tolerations, deployment policies, autoscaling, update policies), container information (init containers, containers), and storage information (volumes, volume mounts). Click the "Save" button.

Not all information needs to be entered. You must set the name, group, description, and at least one container information. Other information can be entered as needed.

Item (* is required)
Content

Type

It is displayed according to the type selected when creating the workload

Name*

Enter the name for the workload to be created

Group*

Choose one from the existing workload group names

Description*

Write a description for the workload

Label

Specify key/value pairs for identification using this information

Annotation

There are no specific features, but this is used as additional explanation

Node Affinity

Check the labels of nodes and configure deployment only on nodes with the specified label

Toleration

Set rules to allow pod placement on nodes with taints

Deployment policy

Configure overall policies for pod deployment regarding replicas, hosts, startup/shutdown times, permissions, etc

Auto Scaling

Set the system to automatically adjust (scale) based on resource considerations

RollingUpdate Strategy

Define policies needed for pod updates

Image Pull Secret

Automatically register Harbor login information to access and retrieve container images from Harbor

2.1.1 Register Image Pull Secret with Workload

1) Select the workload where you want to register the secret, then click on the icon next to "image pull secret"

2) Choose the secret to register, click "+ Add", and then click "Save"

2.2 Enter Container Information

1) Container Basic Information

Enter container name, image information, and resource requests and limits for CPU/Memory/GPU. Container name and image information are mandatory. If CPU/Memory resource requests and limits are not entered separately, the default values displayed in gray on the input screen will be set.

Item (* is required)
Content

Name*

Enter the container name to be created, using only lowercase letters, numbers, and the hyphen (-) for special characters

Image*

Provide image information for creating the pod

CPU *

Set the amount requested and the limit amount to configure the necessary CPU (amount requested) during pod startup and the maximum CPU that can be allocated (limit amount) The default is 100

Memory*

Set the Amount Requested for memory and the Limit Amount for the maximum memory allocation during pod startup

GPU resources

If the pod uses GPU, specify the Limit Amount and Amount Requested for GPU

2) Container Commands

  • Container commands are not mandatory but can be used if necessary.

Enter the commands and arguments to be executed in the container.

  • Command and arguments can be optionally added with the [+ Add] button.

  • If unnecessary, use the [ - ] button to the right of the text field to delete.

Item
Content

Command

Enter the command values to be executed when the pod starts

Arguments

Provide arguments for the command to be executed when the pod starts

3) Container Environment Variables

  • Container environment variables are not mandatory but can be used if necessary.

Set various configuration information to be used in the container. Configuration information includes environment variables, config maps, secrets, and field references for workload metadata. Config maps and secrets to be used in the container must be pre-created on a separate configuration information screen.

Item (* is required)
Content

Direct input (KEY)*

Enter the "key" directly for the environment variable to be registered when setting up pod environment variables

Direct input (VALUE)*

Input the "value" directly for the environment variable to be registered when setting up pod environment variables

Config map Value (KEY)*

Enter the name of the ConfigMap value to be registered in the environment variables

Config map Value(VALUE)*

Select the name of the previously configured ConfigMap

Secret Value (KEY)*

Enter the name of the Secret value to be registered in the environment variables

Secret Value(VALUE)*

Select the name of the previously configured Secret

Field Ref(KEY)

Enter the key that references the field value of the pod

Field Ref(VALUE)*

Input the value that references the field value of the pod

Resource Field Ref(KEY)

Enter the key that references the resource field value of the pod

Resource Field Ref(VALUE)*

Input the value that references the resource field value of the pod

4) Security Settings

  • Security settings are not mandatory but can be used if necessary.

Set user and permissions for the container or Linux capabilities.

Item (* is required)
Content

Run as Non ROOT

If the container is not going to run as the root user but as a regular user, it is necessary

Run as User

Input the user to be used when the container is running

Run as Group

Input the group to which the container will belong

Run Privilleged Mode

It is necessary if the container needs to interact directly with the host system's kernel

Allow Privillege Escalation

Decide whether to allow privilege escalation

Read Only Root filesystem

Set whether the container's root file system should be read-only

seLinuxOptions(level)

Set the level used in SELinux security policy

seLinuxOptions(role)

Set the role used in SELinux security policy

seLinuxOptions(type)

Set the type used in SELinux security policy

seLinuxOptions(user)

Set the user used in SELinux security policy

Linux Capabilities(add)

Add additional Linux kernel features

Linux Capabilities(drop)

Remove specific Linux kernel features

5) Health Check

Health check settings are not mandatory but can be used if necessary.

Set Liveness Probe and Readiness Probe for the container.

  • You can choose the probe type on the Liveness Probe tab and Readiness Probe tab.

    • EXEC: Execute a specified command inside the container and check the exit code.

    • TCP SOCKET: Attempt to establish a TCP socket connection to a specific host and port and check success.

    • HTTP GET: Send a GET request to the specified HTTP endpoint and check success.

6) LifeCycle Hook

LifeCycle Hook settings are not mandatory but can be used if necessary.

Enter PostStart and PreStop lifecycle hooks.

  • You can choose the hook type on the PostStart tab and PreStop tab.

    • EXEC: Register a command to be executed internally in the container before it starts (PostStart) or before it terminates (PreStop).

    • HTTP GET: Register an HTTP GET request to a specified HTTP endpoint after the container has started to ensure it is ready to serve or check before termination.

7) Container Ports

Enter container port information.

  • The Container Port field is a mandatory input.

  • The Protocol field allows you to choose TCP, UDP, or SCTP.

Item (* is required)
Content

Container Port*

Enter the port number for the container port to be created

Protocol (Choose one)

Specify a specific communication protocol used for network communication

name

Enter the name of the container port to be created

Host IP

Input the IP address of the host machine

Host Port

Specify the port number on the host machine that connects to the corresponding container port

2.3 Enter Init Container Information

1) The input items for init container information are the same as for regular containers. (Only the execution order is different.)

2) An init container is a one-time-use container that runs before the main application container starts within a pod. Init containers are used to perform specific tasks before the application container starts and to pass the results to the application container through a shared volume.

2.4 Enter Deployment, Autoscaling, and Update Policies

The deployment, autoscaling, and update policy input sections are located below the basic workload creation information input section. The order of input does not matter, and you only need to set the information as needed.

1) Toleration Settings

Item (* is required)
Content

Effect (Choose one)

You can set rules for placing Pods on nodes, with three options: NoSchedule, PreferNoSchedule, and NoExecute

Key*

Write the Key value for Toleration

Operator (Choose one)

Choose between Exists and Equal. Equal checks if both the key and value effect match, while Exists ignores any taint

Value*

Write the Value for Toleration. If you choose the Equal option for Operator, it becomes active

Toleration Seconds

When a Pod is scheduled on a specific node, this represents the maximum time the Pod is temporarily allowed on that node, even if the node has a specific Taint. This is activated when you choose the NoExecute option for Effect

2) Deployment Policy Settings

  • The Replicas field is a mandatory input. Enter the number of instances to replicate as a positive integer.

Item (* is required)
Content

Number of copies

Write the number of instances to replicate

Host Name

Write the hostname

Grace period (seconds) on exit

Used to set the time to wait before a container or pod is terminated

Waiting time after preparation(seconds)

Time to wait after the task is completed before executing additional actions

Node Label KEY

The Key value of the label that the node has when deploying instances to a specified node

Node label value

The value of the label that the node has when deploying instances to a specified node

Access authority (RBAC services Account)

Service account used to manage access permissions for resources

3) Autoscaling Settings

  • If using CPU and Memory types, the HPA name field is activated and is a mandatory input.

Item (* is required)
Content

CPU Type

If you check the box on the right, choose between Utilization and AverageValu - Utilization : The percentage of CPU used to process tasks - AverageValue : Average CPU usage

CPU Utilization(%)

If you select CPU type as Utilization, it becomes active

CPU Average Usage Value(mCore)

If you select CPU type as AverageValue, it becomes active (minimum value must be greater than or equal to 1)

Memory Type

If you check the box on the right, choose between Utilization and AverageValue. - Utilization : The percentage of memory used to process tasks - AverageValue : Average memory usage

Memory Utilization(%)

If you select Memory type as Utilization, it becomes active

memory average usage value(MB)

If you select Memory type as AverageValue, it becomes active (minimum value must be greater than or equal to 1)

HPA name

Set the HPA configuration name

Max Replicas, Min Replicas

Write the maximum and minimum number of instances to be maintained

Scale Use

Either CPU type or Memory type must be used for activation - Scale Down : Choose between Disabled, Max, and Min - Scale Up: Choose between Disabled, Max, and Min

4) Update Policies

Item (* is required)
Content

RollingUpdate Strategy

Choose one between Rolling Update and Recreate

Percentage of Interruption to Replication

It becomes active when Rolling Update is selected

Choose one between Percentage and InstanceCount

Expansion ratio vs. number of copies

It becomes active when Rolling Update is selected Choose one between Percentage and InstanceCount

3. Modify Workload

3.1 Detailed Inquiry of Workload Settings

To update the settings for a configured workload, access the configuration screen for that workload. Here, we'll use the example of modifying the container image. The process remains the same for other configuration changes; save the modified settings and restart the workload.

3.2 Change Workload Settings (in the case of modifying the container image)

1) Click on the "Settings" tab after selecting the workload to be changed.

2) Single-click on the container name, modify the image name, and apply the changes.

3) After completing the modifications, click "Save and Start."

3.3 Check the Application of the Modified Settings

Monitor the situation where the container restarts with the updated image settings on the detailed workload monitoring screen.

4. Stop/Restart/Delete Workload

To stop, restart, or delete a specific workload, access the detailed deployment information screen for that workload.

4.1 Stop/Restart Workload

Click the "Actions" button at the top right of the detailed deployment information screen for the running workload. A selection box will appear, allowing you to choose to stop or restart the workload. Select either "Stop" or "Restart" based on your needs.

4.2 Delete Workload

Before deleting a running workload, you must first stop the workload. Click the "Actions" button at the top right of the detailed deployment information screen for the stopped workload. A selection box will appear, allowing you to start or delete the workload. Choose "Delete," and the workload will be deleted.

1) Click "Actions," choose "Stop" to halt the running workload.

2) After stopping the workload, click "Actions" for the stopped workload, choose "Delete" to remove the workload.

5. Workload Group Management

5.1 Change Workload Group Display

When accessing the workload query menu in the service map, workloads are sorted and displayed based on workload groups. The display method of workload group names or arrangements can be changed as follows.

  • Change Group Name

  • Change Column Count

  • Move Left

  • Move Right

  • Add Group on the Left

  • Add Group on the Right

To perform these actions, click on the "expand menu (three dots)" displayed to the right of the workload group name.

5.2 Delete Workload Group

To delete a workload group, there should be no workloads within that group. If there were existing workloads in the group, they must be deleted first.

To delete a workload group, click the "expand menu (three dots)" displayed to the right of the workload group name. You will see "Delete Group" is activated and displayed in the popup. Select this option.

this link.
[Screen] Add Workload Group
[Screen] Input Workload Group Name
[Screen] Confirm Added Workload Group
[Screen] Select Workload Type
[Screen] Input Overview for Workload
[Screen] Registering image pull secret
[Screen] Enter Container Command Information
[Screen] Enter Environment Variable Information
[Screen] Enter Security Contexts Information
[Screen] Enter Health Check
[Screen] Enter LifeCycle Hook
[Screen] Enter Container Port Information
[Screen] Enter Deployment, Autoscaling, Update, Policy
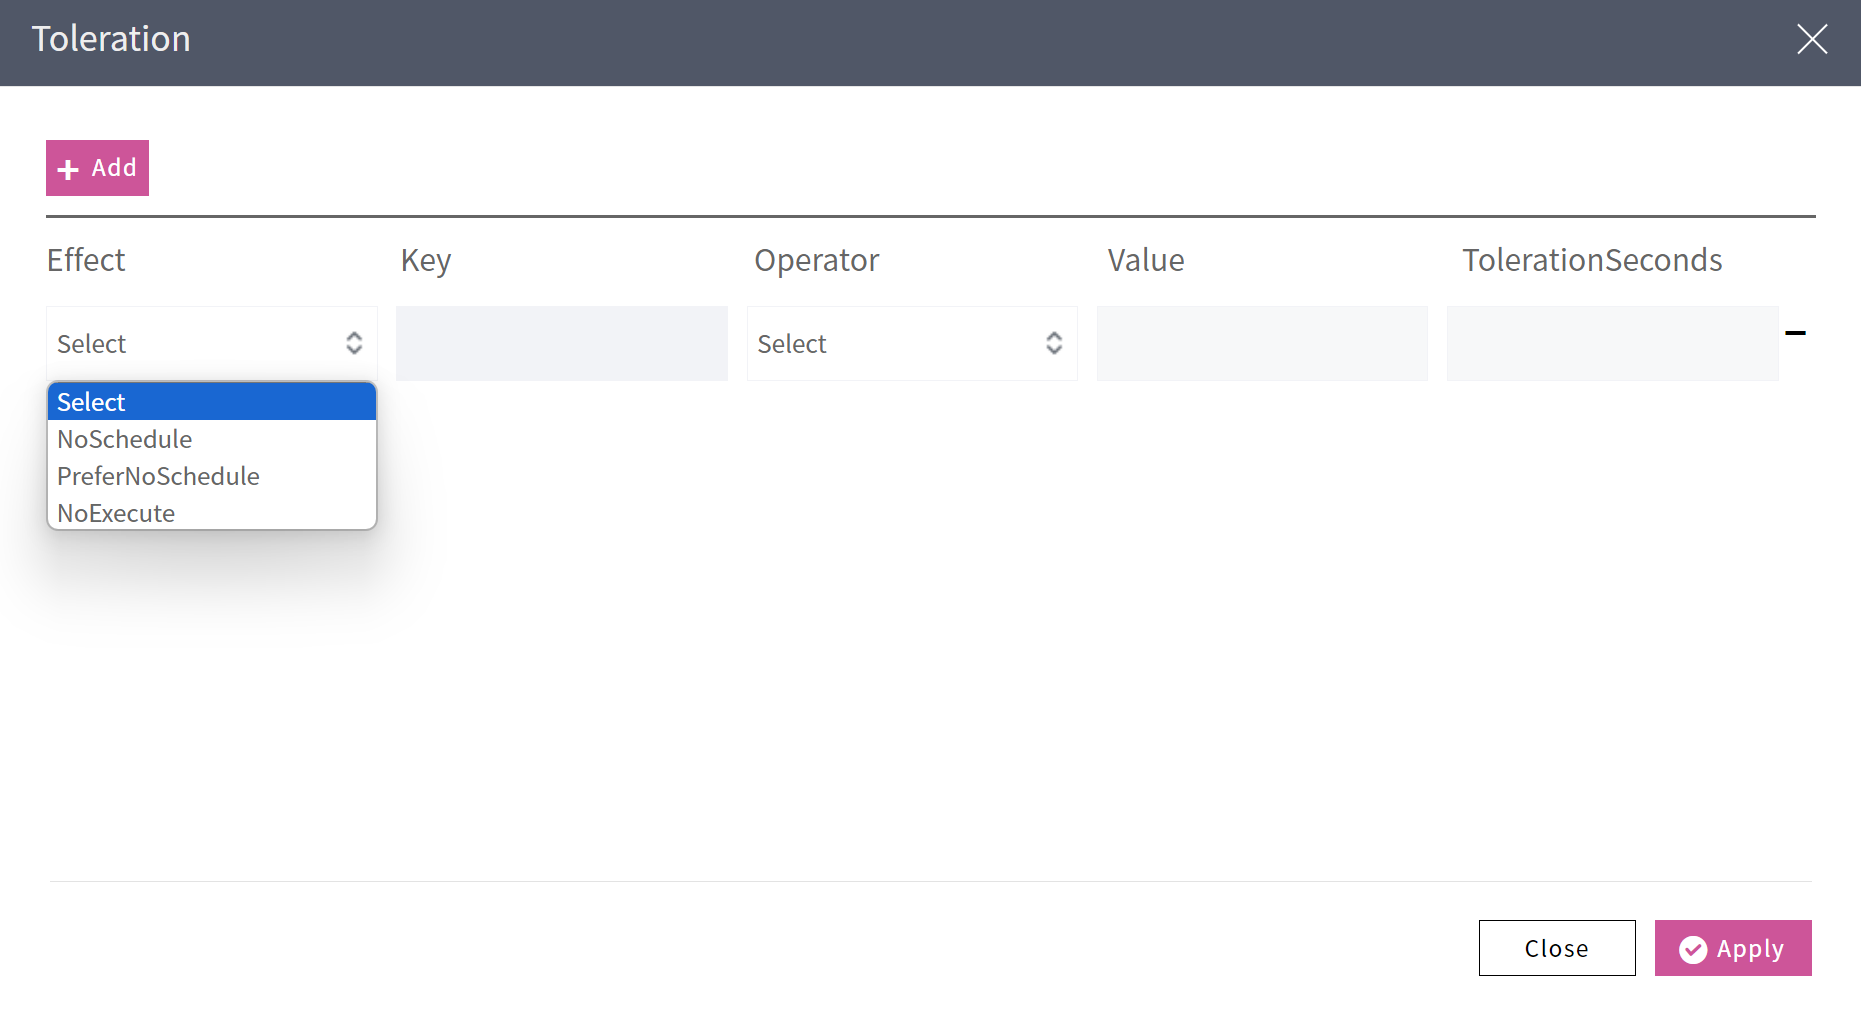
[Screen] Enter Toleration Information
[Screen] Enter Deployment Policy
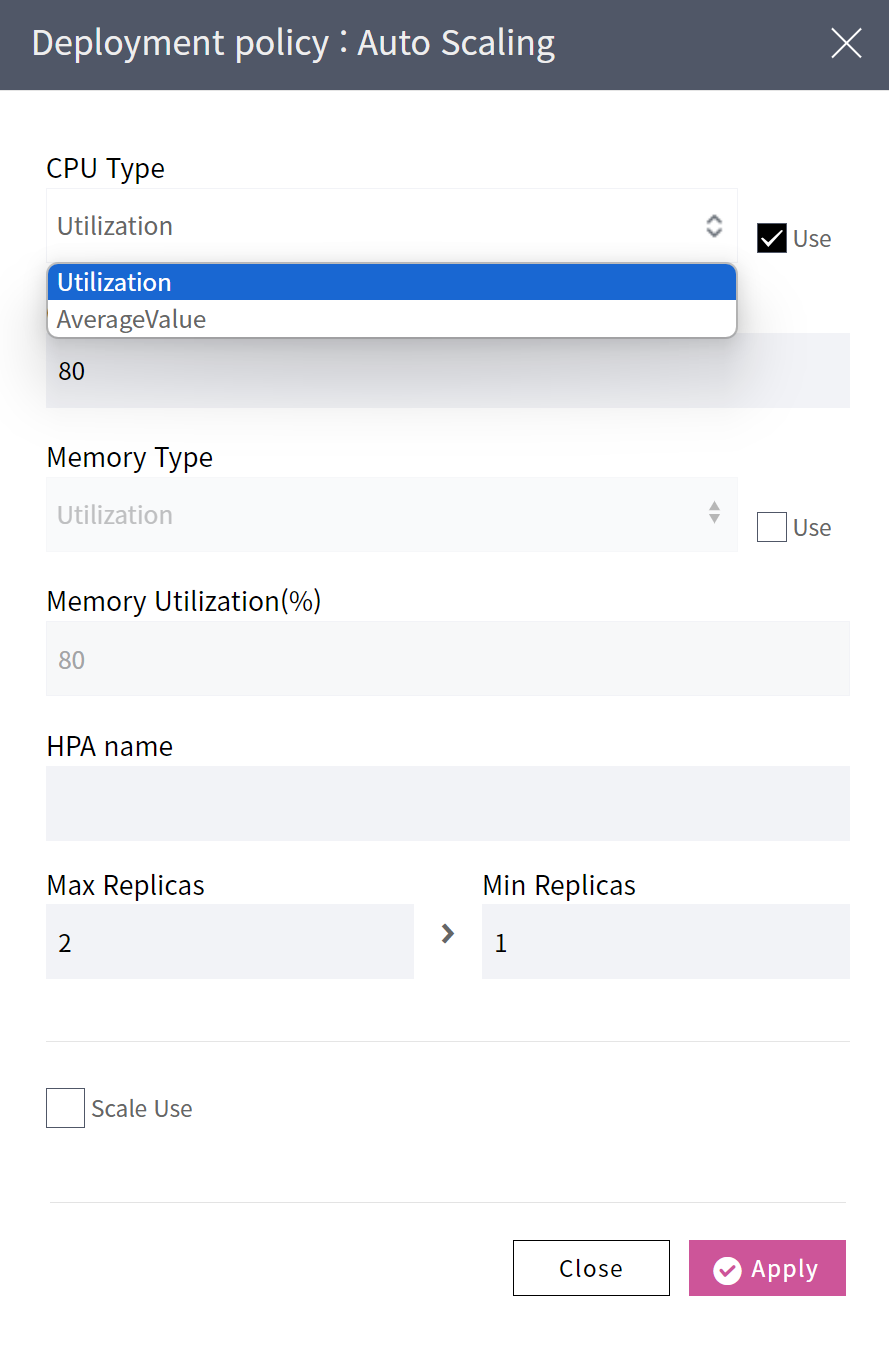
[Screen] Enter Autoscaling Policy
[Screen] Enter RollingUpdate Strategy
[Screen] Detailed View of Workload Configuration
[Screen] Image Configuration Change
[Screen] View Container Restart Situations
[Screen] Perform Stop/Restart for Workload
[Screen] Perform Workload Deletion
[Screen] Change Display of Workload Group