LogoLogo
Cocktail Cloud
  • What is Cocktail Cloud?
  • Apply for Service
    • Using Cocktail Cloud
  • overview
    • Kubernetes and Cocktail Cloud
    • Understanding Concepts
      • Platform
      • Workspace
      • Cluster
      • Service Map
      • Image Build
      • Security
      • Monitoring
      • Catalog
  • Getting Started
    • Cluster Creation
      • AWS (EKS)
      • NCP (NKS)
      • Azure (AKS)
      • GCP (GKE)
      • ETC (Datacenter)
    • Cluster Registration
      • AWS (EKS)
      • NCP (NKS)
      • Azure (AKS)
      • GCP (GKE)
      • ETC (Datacenter)
    • Managing Cloud Provider
      • AWS
    • Creating a User
    • Create Service Map
    • Create Registry
      • Create Registry
      • External Registry Registration
        • Setting Up AWS ECR
        • Setting Up Azure ACR
        • Setting Up Docker Hub
        • Setting Up Docker Registry
        • Setting Up Google GCR
        • Setting Up Harbor
        • Setting Up Naver
        • Setting Up Quay
    • Create a Workspace
  • Cluster Backup and Restore
    • Cocktail Backup and Restore
    • Backup/Restore Preparations
      • AWS S3 Configuration
      • Azure Blob Storage Configuration
      • Google Cloud Storage Configuration
      • MinIO Configuration
    • Create storages
    • Backups
    • Restoration
    • Backup/Restore Overview
  • Log Service
    • Cocktail Log Service
    • Installation
      • Install Log Service
      • Registration Log Service
      • Install Log Agent
      • Install Log Operator
    • Setting
      • Change Opensearch Admin password
    • Application Logs
      • Application Management
      • Application logging
        • Automatic instrumentation of container logs
          • Java
          • Python
        • Manual measurement of file logs(SDK)
          • Java
          • Python
        • Manual measurement of file logs (Sidecar)
          • Fluent-bit
    • Container Logs
    • Cluster Audit Logs
    • Troubleshooting
  • CI/CD
    • Creating a Build Server
    • Build Image
    • Setting up a Pipeline
  • application
    • Catalog
    • Application Deployment
    • Configuration Information Creation
    • Volume Requests
    • Service Exposure
    • Ingress
    • Service Mesh Configuration
  • Platform Management
    • Multicluster Configuration
    • Cluster Management
    • Workspace Management
    • Security
    • Integrated Monitoring
  • API Management
    • API Token Issuance
    • API Issuance History
    • API Execution Logs
  • Certificate Management
    • Issuer Management
    • Private Certificate
    • Public Certificate
  • Deepening operations
    • Maintaining Login Session in Case of Inability with Ingress Configuration
    • Add Ingress Proxy Configuration
    • Accessing Harbor from a Server Other Than the Registry VM
    • Configuring Harbor with a Public SSL Certificate
Powered by GitBook

â“’2023. Acornsoft Corp. All rights reserved.

On this page
  • 1. Build Image
  • 1-1. Build Image Info
  • 1-2. Code Repository Work
  • 1-3. User Work
  • 1-4. Build Image Task
  • 1-5. Run Image Build Task
  • 2. Additional Configuration for Image Build
  • 2-1. File(FTP) Task
  • 2-2. Calling REST Work
  • 2-3. Script Work

Was this helpful?

Export as PDF
  1. CI/CD

Build Image

The build server required for image building has been created. Now, let's proceed with building the image.

PreviousCreating a Build ServerNextSetting up a Pipeline

Last updated 1 year ago

Was this helpful?

1. Build Image

1-1. Build Image Info

1) Select the [Build/Pipeline] - [Builds] section.

2) Click on the "+ Create" button in the upper right corner.

3) Once the build information window is generated, enter the build details as follows.

Item (* is required)
Content

Image Name*

Specify what the image represents in detail (Note: Avoid the use of uppercase)

Registry*

Select the registry you created

(If there are multiple registries, choose the applicable registry)

Use Auto Tag (Choose 1)

Indicate whether tags should be automatically set when updating or changing the image

(Split into "Use/Do Not Use," and if "Do Not Use" is selected, the tag may be fixed, overwriting the existing image)

Tag*

Provide details for the tag to be attached to the created image

(If "Do Not Use" is selected for auto-tagging, the tag entered here will be used consistently)

Auto-Increment Type (Choose 1)

If auto-tagging is set to "Use," it can be specified as "Time/Sequence"

Build Execution Server (Choose 1)

Select the server to perform the build

4) Click the "+ Add a Build operation" button at the bottom to select the necessary items for the build process.

Item (* is required)
Content

Code Repository Work

Configure information to fetch source from git or similar sources

User Work

Configure information related to the build of the source fetched from git or similar sources

File (FTP) Work

Set up tasks to download or upload files or directories between the remote host and the build host where the build tasks are performed

Calling REST Work

If integration with external services is required using the REST method, configure REST call tasks

Script Work

Configure script information if a specific script is needed

Build Image Work*

Write a Dockerfile to apply the built source to a Base image and create a new image

1-2. Code Repository Work

1) Select the [Code Repository Work] and enter details about the Git or other source from which to load the code, then save.

Item (* is required)
content

Work Name*

Refers to the job stage for the image build, and enters a title for that job

Repository Address*

Enter the address for the Git or other source repository from which to import the source code.

Branch*

Enter the source branch applied to the repository

Authentication

When selecting the combo box for authentication, you must enter the user account and password required to access the git

Code Storage Path

Enter the directory to store the source (Automatically create git project name if not created)

1-3. User Work

1) Click the "+Add a Build operation" button to select [User Work]

2) In the [Execution Information] section, enter the necessary commands for source build and apply.

[User Work - Execution Information (Maven)]

  1. Work Name: Provide information about the purpose or content of this task.

  2. Execution Path: Specify the path where the build will be executed in the build container. 1. Enter "/build" as a fixed value when writing.

[User Work - Execution Information (Ant)]

  1. Work Name: Provide information about the purpose or content of this task.

  2. Execution Path: Specify the path where the build will be executed in the build container. 1. Enter "/build" as a fixed value when writing.

3) In the [Work Volume] section, enter the directory path required for source build and apply

Item (* is required)
Content

Container Path*

Write the path to the container where the source will be built

Build Host Path*

When building the source, a temporary container is created to proceed with the build. This is the path to the temporary container used during the source build

1-4. Build Image Task

1) Click the "+ Add a Build operation" button and select [Build Image Work].

2) In the [Build Image Work] section, write the Dockerfile to create a container image after the source build and apply.

Item (* is required)
Content

Work name*

Refers to the job stage for the image build, and enters a title for that job

enter docker file content*

Write a Dockerfile to create the actual container image

3) After clicking the "Save" button, a popup for [Build Notes] for the build creation will appear below. Write comments for this build and save.

1-5. Run Image Build Task

1) Once the save is complete, the image build automatically proceeds, and you can review details about the build as shown in the screen below.

2) In the [Build Info], clicking the "View Log" button allows you to check the logs for the image build.

3) Upon successful completion of the build, confirm that all progress is marked as "Done" as shown below.

2. Additional Configuration for Image Build

2-1. File(FTP) Task

1) Write files or directories for downloading or uploading between the remote host containing resources related to the build target and the build host where the build task will be performed.

2) Click the "+ Add a Build operation" button and select [File (FTP) Work].

Item (* is required)
Content

Work name*

It refers to the operation stage for the file (FTP), and enter a title for that operation

Host address*

Server address with the directory or file that needs to be uploaded

Certification*

Need to set up if you have an account and password for the host address

User/Password*

Connection account and password for the host address

Task type (choose one)

File Download (If you want to include it in the image during image build, select this type)

Remote Directory/File*

Absolute path to the file to be uploaded to the image when building the image (Host address must have that file)

Build Host Directory*

Directory location to upload (/tmp/ fixed)

2-2. Calling REST Work

1) If integration with an external service is required using the REST method, configure the REST call task.

2) Click the "+ Add a Build operation" button and select [Calling REST Work].

Item (* is required)
Content

Work name*

Indicates the operation stage for a REST call, and enters a title for that operation

REST Method (choose one)

Choose the API call method

URL*

Write the URL for the API call

Certification

Configuration required if there is an account and password for the host address

User/Password

Username and password for the host address

Connection Timeout*

Write the response time for the API call

Expected response code*

Write the success code after the API call (ex] 200)

Expected response content

Must be left blank

Save the response to the build host path

Write the filename if response value storage is required (ex] response.txt)

3) If headers are required, select "+ Header Add " enter the Header and Value, and click the "Apply" button.

  • Enter in the format: Header: Authorization, Value: Basic {authentication string}.

  • The {authentication string} should be a base64-encoded string of the Image Registry's id:password.

2-3. Script Work

1) Define tasks for cases where scripts are needed during image builds.

2) Click the "+ Add a Build operation" button and select [Script Work].

Item (* is required)
Content

Work name*

Define the steps for the image build process along with the corresponding work title.

Enter the script content*

Enter the content of the script to be executed.

3) Complete the script task and click the "Apply" button in the bottom right corner.

[Screen] Initial Image Build Screen
[Screen] Image Build Information
[Screen] List of Build Jobs
[Screen] Code Repository Operations
[Screen] Code Repository Operations After Writing, Click "Add a Build operation" Button
[Screen] User Task Execution Information for Maven Build
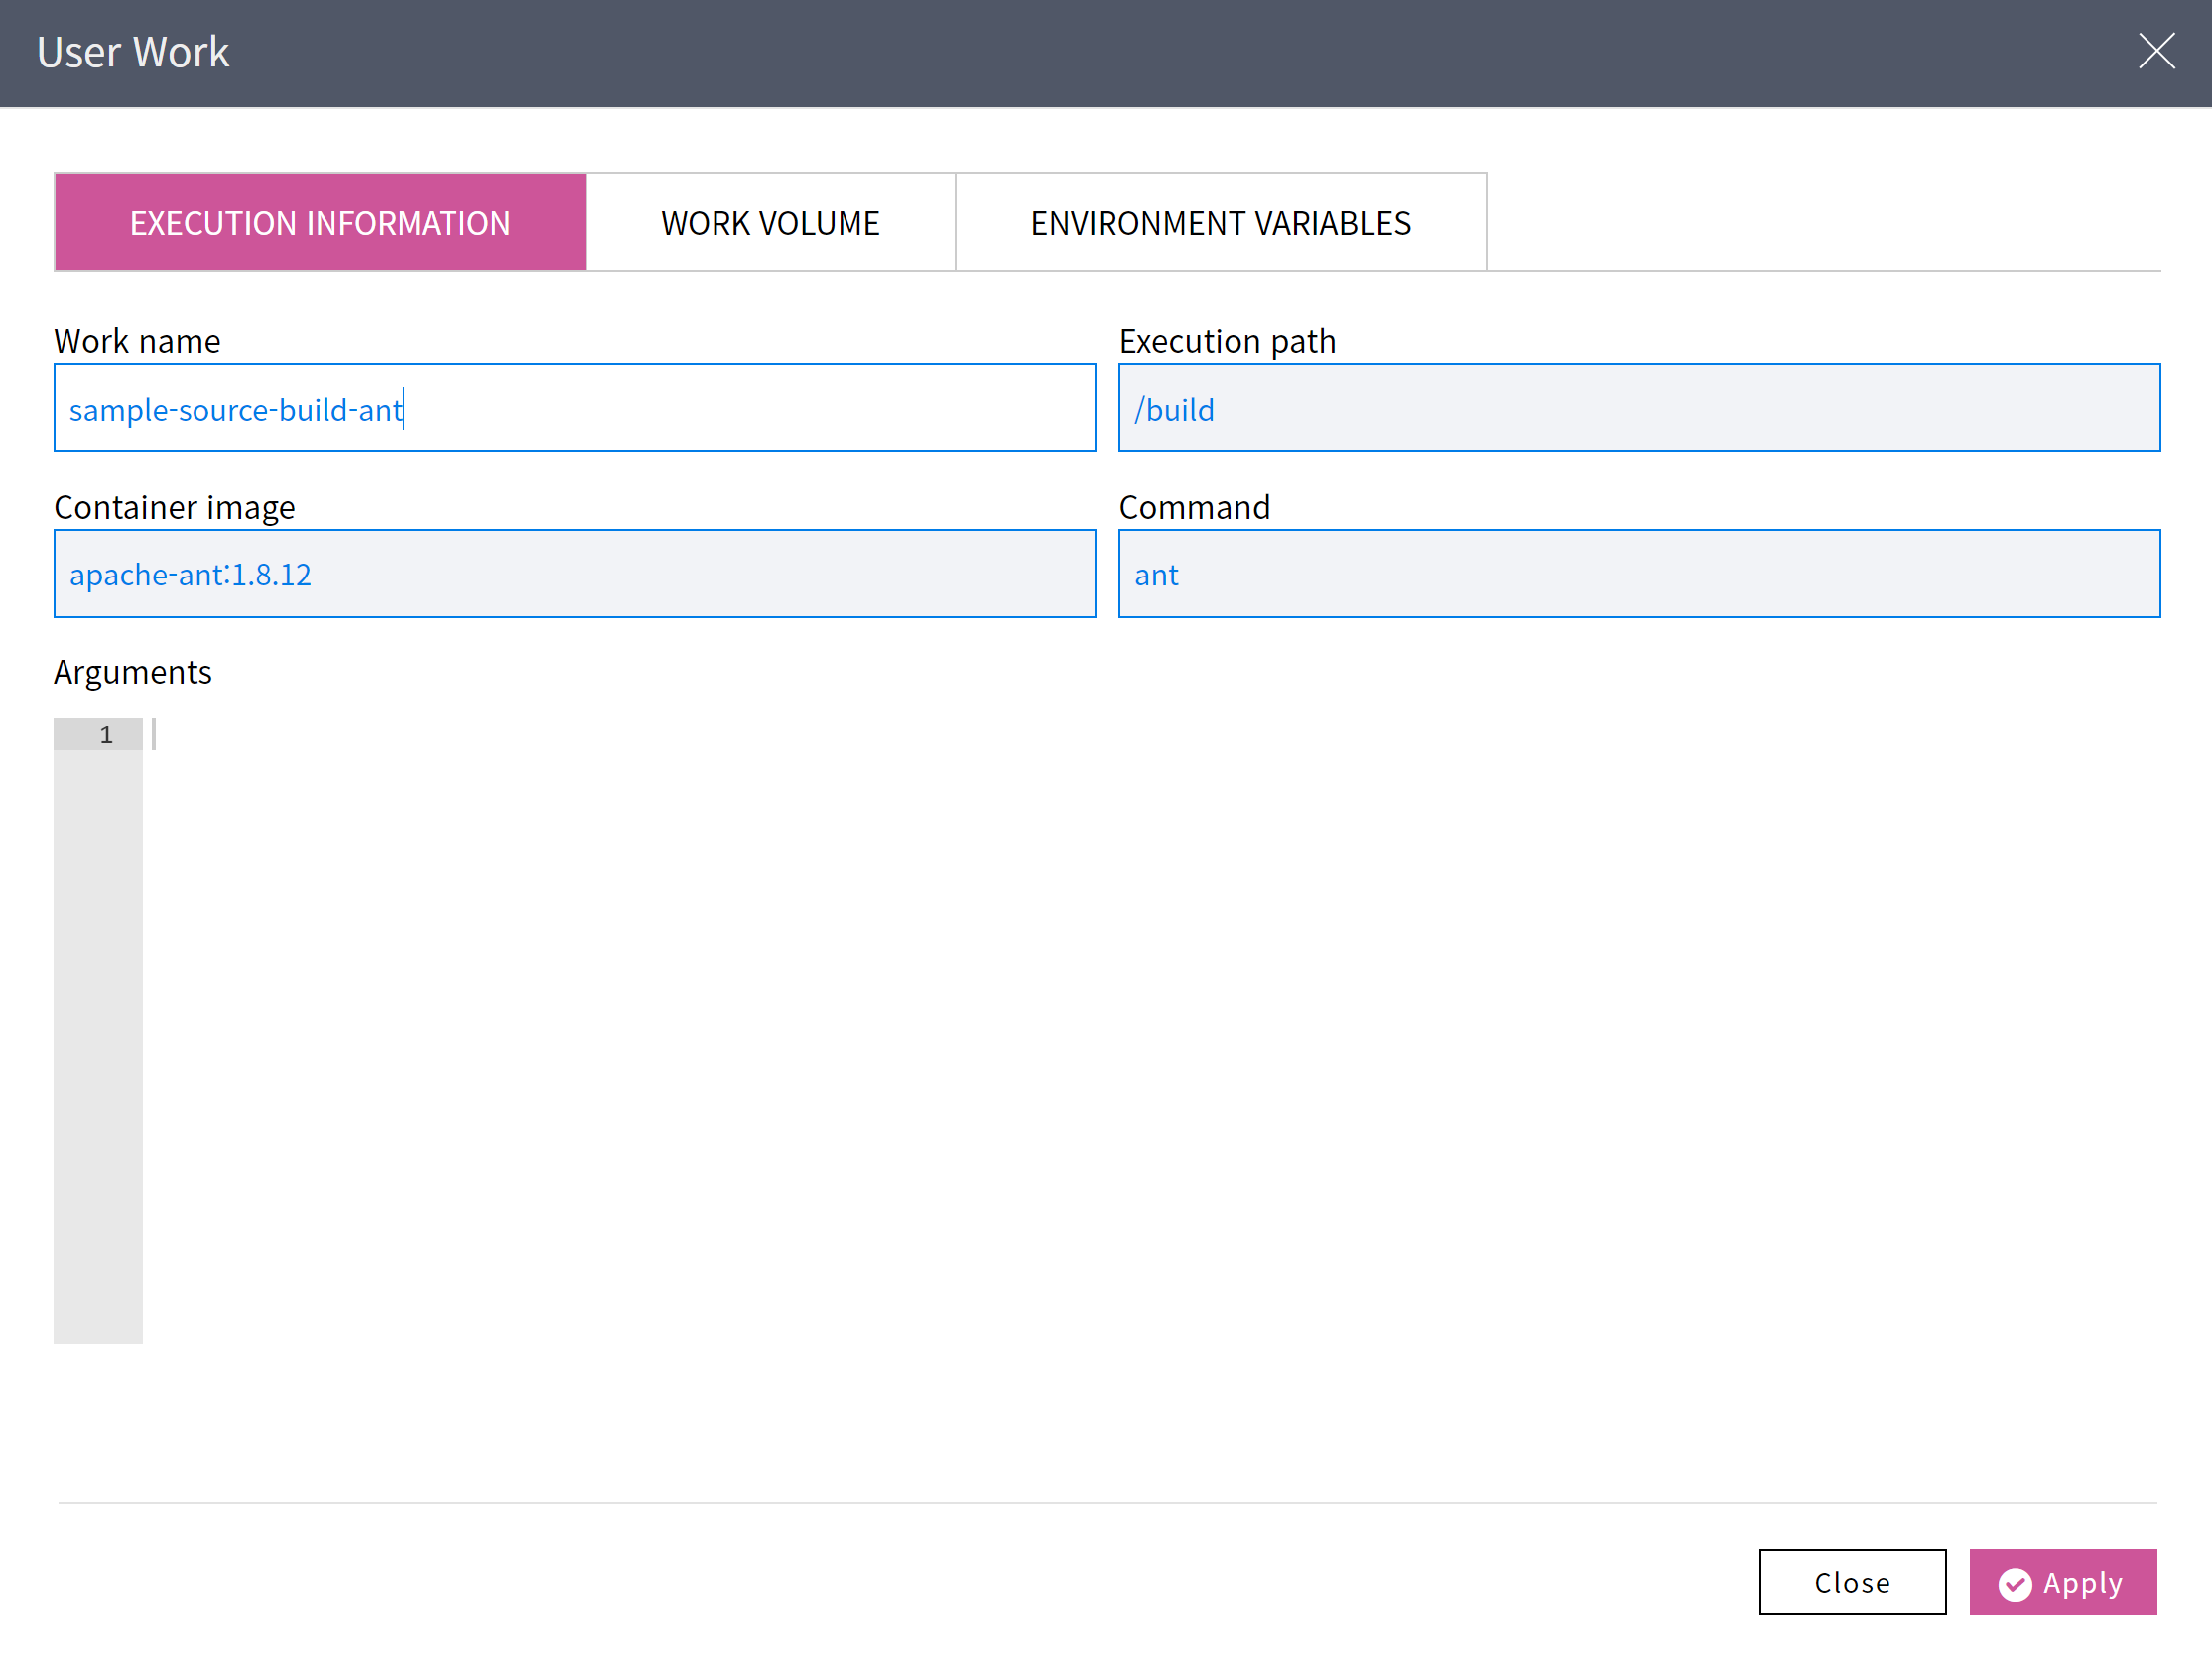
[Screen] User Task Execution Information during ant Build
[Screen] User Work WORK VOLUME
[Screen] After writing the user Work, click the "Build image Work" button.
[Screen] Write Dockerfile
[Screen] Completion of writing the build image work
[Screen] Build Image Creation Popup Window
[Screen] Run Build Image
[Screen] Build Image Execution Log
[Screen] build Image complete
[Screen] File (FTP) Work
[Screen] Calling REST Work
[Screen] Calling REST Work Screen - HEADER
[Screen] Script Work